Showing posts with label KLM digital design. Show all posts

May 9, 2024

Hello there! 
Today's card is another combination of klmdigitaldesign and Waffleflower postage die. 
I used the floral cupcake assortment digital and scaled them all to a bit less than 1.5 inches. They fit perfectly in the areas of the die. All were colored with Copic markers. 
sentiment stamps are from MFT stamps.

Jan 8, 2024

Happy Mail


Happy New Year 

Welcome to another year of creating. Today I'm sharing two cards using the same image.

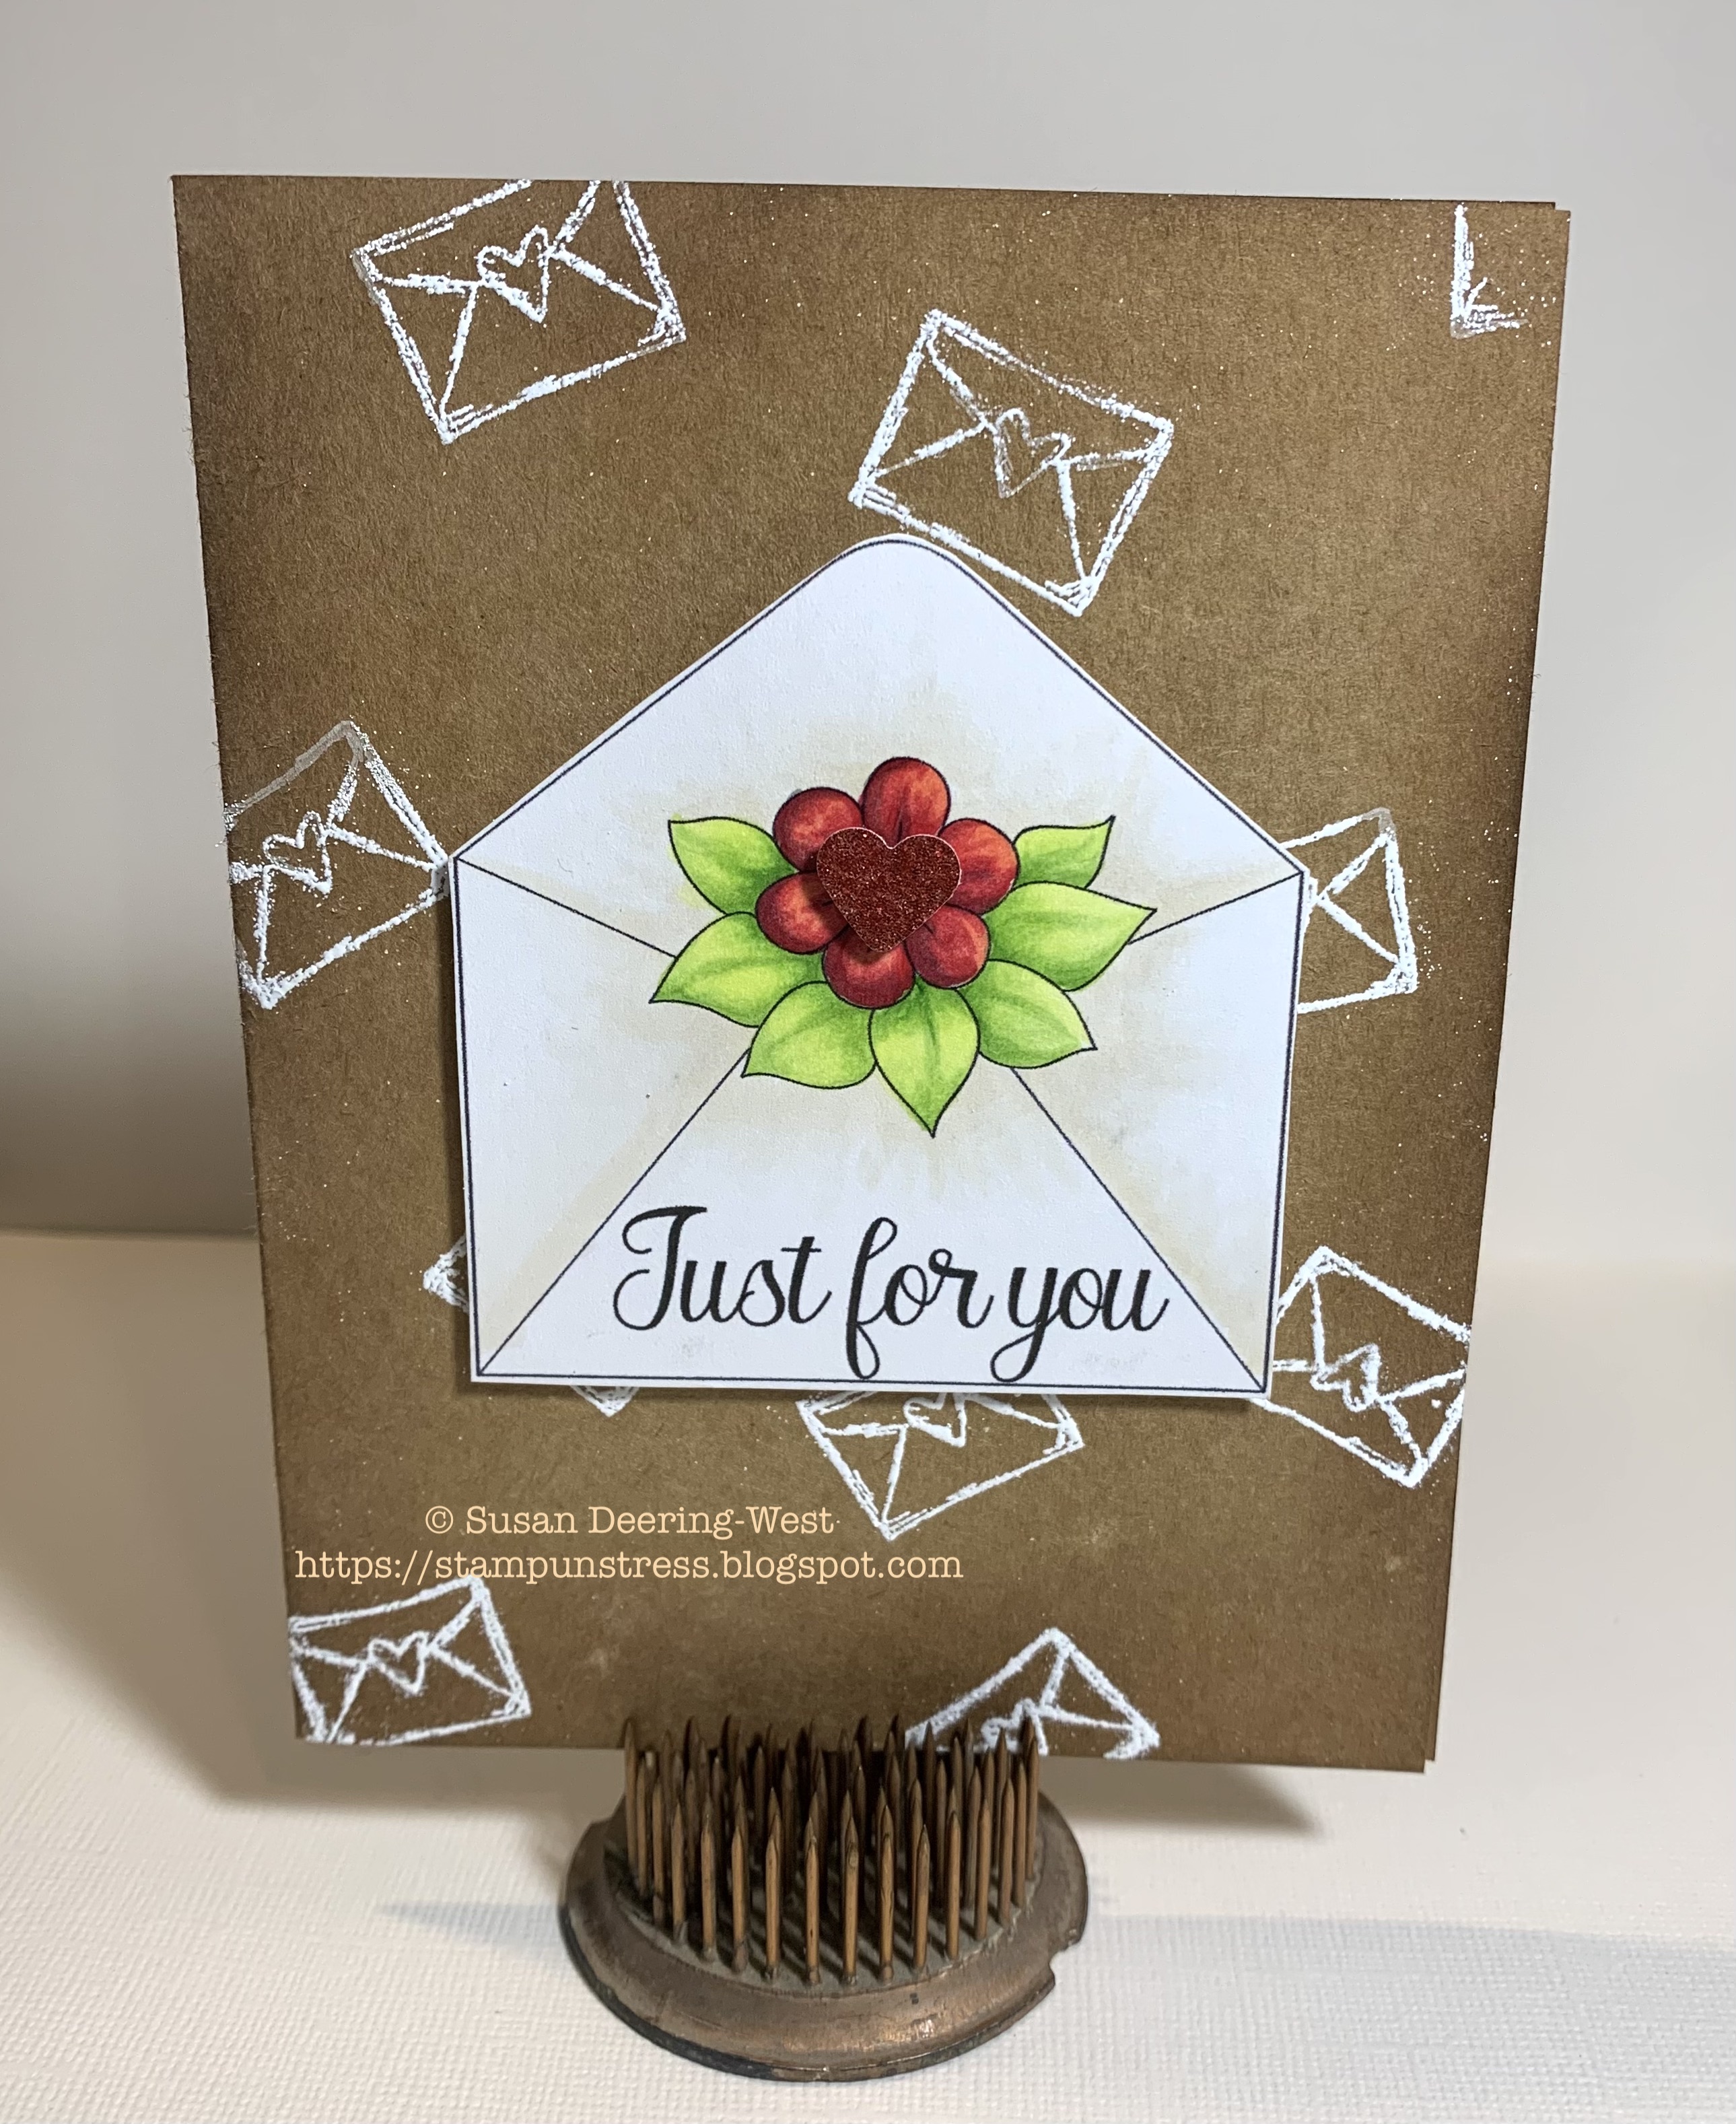
This first image is the front of a card using KLM Digital Designs image Floral Envelope.

The card base was lightly brushed around the edges with  Walnut Stain Distress Ink, and the small envelopes were white heat embossed randomly on the front. The image and sentiment were printed on white card stock, colored with Copics, cut out, and popped up on thin 3M foam.
A glitter paper heart punch-out replaces the center of the flower.
The inside of the card uses another of the sentiments included with the image. 
A white panel was die-cut with Postage Edge dies from Spellbinders.
The Panel was Lightly brushed with Vintage Photo Distress Ink. The small hearts were hand-drawn with R29 Copic and accented with red Stickles.
     Copics: Shading- E40, 41, 42, 0
                  Leaves- YG00, 03, 17
                   Flower- R22, 29, T4 under R29 for darker red


This photo image shows a one-layer card (sort of).
The front has 2 panels die cut with the Postage Edge die. I hand-cut along the envelope line and the flower to create an opening for a small note to slip inside. The envelope was popped up on 3M foam.
    Copics: Leaves- YG00, 05, 67
    Shading: BV0000, BV000
    Flower: Y13, 15, 17
A small gem is in the center of the flower. 

Below is the back of the postcard, left blank for a handwritten message. I used the Postmark stamp set from PTI to stamp the back, creating the appearance of a postcard.  
This is not intended to be mailed as a postcard but as a single-layered notecard in an envelope.

I hope you have a wonderful day and a creative year ahead.
Susan


Nov 20, 2023

A Step out of comfort zone

Hi there.
Today I am showing a card so far out of my comfort zone I should probably have a pass port!!

I am drawn to Mandalas and Zen Tangle designs. I have tried with varying success to draw some, but have never been very successful at coloring them. When I saw this on the KLM digital Designs site I instantly thought of my favorite Maine ocean trips and "beachy" colors. 

I only used half of the design because I messed up the other half, naturally. I used some Distress Inks and masking to fill some of the areas and a combination of Copic markers and Sakura Stardust Gelly Roll pens for others. Once colored I fussy cut the good side out and attached to the panels. I played with my new foiling machine for the sentiment and added a few clear gems from Honeybee Designs.

Photo results of foiled and glittery or shiny cards are less than satisfying. The contrast of the dark teal and peach is much better in real life. 
Practice makes better. I need more practice.
Create on!
Susan


Nov 17, 2023

Let It Snow for early skiing!

Hi there! 
The ski season has started here in Vermont.  Actually the first opening was here in Killington on the third of November.  A bit earlier than usual.
That news prompted me to use the KLM Digital Design pre-colored Gnome Skier image from the November release.

I had just received an order of new supplies, one being the Ranger Sparkle Texture Paste. The lesson learned here was less is more. This paste has a much looser consistency, so less is necessary. I used a bit of a heavy hand, initially, and the paste moved UNDER the stencil. It dries with a very glossy finish so the result on some of the flakes is a bit blurred. 
Anyway, the background was brushed with Speckled Egg and Blueprint Sketch Distress Ink, the hill was cut with an MFT die. I believe the little trees are Poppy Stamps Dies. Let it Snow is from the SU set Tiny Talk and is embossed in Liquid Platinum. The stitching lines were made with the Wonky Stitched Rectangle dies from MFT stamps. The snowflake stencil is a Tim Holtz product THMM133.

So, if you're not hitting the slopes, grab some supplies and start creating!
Susan


Nov 13, 2023

Pre-colored Gnome stack

Greetings! It's getting to be that time again!
One of the reasons I like to play with a pre-colored image is that it takes that extra coloring time away so I can fuss with other parts of the card. Here I have used the pre-colored Gnome Stack from KLM Digital Designs.

This is a Double Box card.
It looks complicated but, believe me, it is not.
I used SU Handsome Hunter and Merry Merlot card stock and papers from a holiday pad by Park Lane (Joann's).
The tiny Poinsettia's were cut from an old mini punch and stacked.
Holly Jolly is cut from the same gold and Merry Merlot papers with Sizzix die  663137.

So, when fussing with a new design, try using a pre-colored image to work with and save a bunch of time 😉.
Keep creating,
Susan

Nov 11, 2023

Don't Let Little things Bug You

Hello there.

Today's card is version 2 of the KLM Digital Designs November release, Sitting Gnome with bug jar.

The process is pretty much the same as the other card.
The Stitched Banner Die was from MFT stamps, but I was unable to find it to link. 
The  SU background paper is from the package of "Wood Textures".
Copic colors:
Skin - E000, E11
Hat - V12, 15, 17, 09
Beard - C1, 3, 4, Multiliner
Shirt - BG72, 75, T2  overcolor in BG24
Pants - E81, 84, 87, 89
Shoes - E81, 84
Mushroom - YR12, 23, 27, E08, Gelly Roll Pen 08 white
Jar - C1, 3, BG10  Gelly roll pen white
Grass and bug - YG23, 17
                            YG61, 13
Don't let those little things bug you! Keep creating.
Susan

Nov 8, 2023

Caught a Bug?


Hello all. Thanks for popping in.

Today's card is one I'm sure we'll need sooner or later, but hopefully not to receive one!

This image is from the November 2023 collection at KLM Digital Designs. The Sitting Gnome with Bug Jar image is colored with Copic markers, the background is lightly brushed with Distress Inks then die-cut with a Sizzix Oval. The green dot is an VERY old piece of SU paper.  The sentiment comes with the image and was fussy cut. The inside sentiment is "Feel better soon", also included with the image.

Copic Color Map: 
Skin- E000, E11
Hat- E41, 42, 43
Beard - C1, 3, 5 , Multiliner
Shirt - YG61, 63, 67
Pants - B37, 34, 39
Mushroom - E42,43, 44, 47  Y000 spots
Jar - C1, 3, 5, BG10 ,  Sakura Gelly Roll 08 White

Stay healthy and keep creating!
Susan

Nov 3, 2023

Coffee Gnome Version 2

Hi again.
As promised, here is version 2 of the KLM Digital Designs Coffee Gnome.
Today's card uses the same image as yesterday's card but has a color and a sentiment change. This sentiment also comes with the image.

The background layer is a VERY old DSP from Stampin'UP.
The image is colored with Copic markers, and the panel is lightly brushed with Blueprint Sketch Distress Ink and gently splattered with water spots.

Copic color map:
Skin- E000, 11
Hat/ Socks- Y02, YR23, T2
Beard- W1, 3, 5, T2 Multiliner
Shirt- B23, 26, 39, T2
Pants- E55, 57, 59
Shoes/  cup- E42, 43, 44, T2
Bag- E41, 42, 43, 44, 47


Oct 29, 2023

Candy cane Bunny

Burrrrrrrr.... How the temperature has changed here! Definitely feels like November is around the corner!

Today's card is a holiday offering using KLM Digital Designs Candy Cane Bunny from the October release.

 Friend Bunny is colored with Copic markers and partially cut with a stitched oval die. The background layer is stamped in red with Tim Holtz's Ticking stamp. I used some leftover foliage die cuts from my Sizzix collection.

The sentiment comes with the image and says, "Sweetest wishes for a wonderful Christmas".  I split the sentiment and put the last part on the inside of the card. There are two other sentiments included with the image.
I think I'm in the mood for a little Peppermint tea 😉

Copic Map:
Bunny: E40,42,43,44, N1
             Ear - E000, E00, R20
Hat: R29, 22, 39
Candy Cane: R22,29,39, T1

Enjoy the day and keep creating!
Susan


Oct 12, 2023

Fall Fido Variations

Hello there, welcome!

Today, I'm sharing two speedy card projects using pre-colored images from klmdigitaldesigns.com
Add a piece of stash paper,  a background made with a Simon Says Background stamp, and Distress Embossing Glazes, and you have two cards. 
The sentiments are from various dog stamp sets from My Favorite Things Stamps.


sunflower fido white

  sunflower fido black


If you are in a pinch and need a quick card, this is the way to go. It took me all of 30 minutes to make both cards. It would have been faster had I not made the embossed paw print background. 
Enjoy the beautiful sunflower weather and keep creating.

Susan

Oct 5, 2023

Christmas Dinosaur

Welcome to my little creative space.

Today's card is a "cousin" to the Pilgrim Dino card seen here 

This is the Christmas Dino from this month's featured images at klmdigitaldesigns.com.

I have again used a variety of materials to go with my image.
Stash papers in red and star-printed kraft provide backdrops for the Spellbinders arch.
 I printed the dino onto card stock 3 times, creating three 4 1/4 x 5 1/2 panels. I used one printed image to cut out the hat. The second panel I cut using the Spellbinders Essential Arch dies and then stenciled the arch with  Distress Inks and stencil THMM133 from Stampersanonymous.com for the background.
The third panel I embossed with the Reptile 3D folder from Tim Holtz. 
I sprayed the embossed dino panel with Distress inks and quickly dried it. Then, used inks and stencil brushes to add more depth and shading. Once I achieved the look desired he was fussy cut.
I colored the hat with copics and glued it in place on the dino.
The dino is popped up with foam tape. Mini rhinestones from Hero Arts were added to the Christmas lights to make them sparkle a bit more. A Sizzix Thinlits set provided the holly accents for the corners.
The sentiment inside completes the front, "Ra Ra Ra Rawr".

Hope you enjoyed this card,
Susan

Sep 26, 2023

Dino-mite Harvest Wishes

Happy Fall Y'all!

It is a stunning day here in Vermont. Trees are beginning to turn and all things harvest are happening.

Today I am sharing this harvest time card using the Dinosaur - Pilgrim from this September's release at KLM Digital Designs.
I printed him on a panel of white card stock and colored him with Copic markers and Distress Ink accents.

The background is stenciled with  clouds from A Colorful Life Designs. It was stenciled with Speckled Egg Distress Ink.
The arch was cut with a Spellbinders die and the foliage accents are from Sizzix/ Tim Holtz Fall Foliage and Funky Foliage.

Copic color map:
Dino- YG91, 95, 97, Distress Ink Forest Moss for skin texture,
nails and scales- YG11, T2, YG97

Pumpkin- Y35, YR15, YR09, E09
Hat- T2, 3, 5, 8, 100;  band- pumpkin colors

Enjoy your day,
Susan 

Sep 15, 2023

Swinging on a Star!

Welcome.

I completely forgot to post this little guy. He was fun to make, and because he was a pre-colored image from KLM Digital Designs, I could spend the time making him into an interactive card. The printed paper in the background was from an old 12x12 pad I got at Michael's. I was stumped on how to use that particular page. Voila, along came this idea.

I placed a penny behind the lower section of the image so he swings back and forth easily when tipped.

Do you remember that song? So many artists recorded it, but my favorite was Bing Crosby.  OHHHH! I'm really dating myself.


Here's a video of the card in action.

I hope you all enjoy the weekend despite the weather forecast and the hurricane influence is minimal in your area. It's a good time to create!

Susan

Mar 24, 2023

Graduate Gnome ll

Hello there, and welcome.

It's hard to believe it's already nearing graduation time. I find it even harder to believe that my Grandson is graduating! The card I am sharing today was made with him in mind.

This is a fairly simple card, using the Graduate Gnome II image and sentiment from KLM Digital Designs and Copic markers. It is layered onto a red and black scrap from my stash and a red card base of Real Red (SU). I made a tiny tassel of black and red heavy thread and dangled it from the mortarboard. The tassel adds a little 3D fun to an otherwise plain card. 

I hope you have a lovely spring day. Thanks for stopping by. 

Mar 17, 2023

Magic Music

Hello there, welcome.

 Today's card uses a little image and sentiment from KLM Digital Designs. The image was colored with
Copic markers and details were added with Sakura Gelly roll Star pen and a fine Multiliner. The image was die-cut with a stitched die and layered onto an alcohol-inked background. That little banner was made with a piece of music from an old music book found in a cellar. Really old...... 1915!

Enjoy your day, preferably with some good music.

Mar 8, 2023

Peace Gnome

Hello and welcome. The card I am sharing today brought back some memories😉.
I remember the 60's well. I was a teen back then, with flower power and tie-dyed rainbow clothes being all the rage. Now that I have seriously dated myself .... this card uses KLM Digital Designs image and one of the sentiments from the Peace Gnome

I used 4 printed images to paper piece this guy. The shirt and hat were cut from an alcohol-inked background paper. The glasses were cut from a scrap of holographic paper. The Peace sign was cut then colored with a Pentel Sparkle Pen in gold. The rest of the image was colored with Copic markers and layered onto a base image. I used an old Stampin'UP embossed specialty paper to make the "flower power" background. 
The stitched layers were cut using dies from My Favorite Things.

Paper piecing is a great way to give an image depth. I opted not to add foam to the cut pieces this time. If you try this just make sure you use sharp scissors! Ask me how I know 😡.

Jan 13, 2023

Girls Best Friend

Hello there, thanks for stopping by.

Today's card uses a pre-colored image from KLM Digital Designs and a bunch of OLD stuff sitting in the stash! I typed out the sentiment and cut it with a stitched rectangle die.

The image was printed onto card stock and popped up with thin 3M foam tape. The paw print stamp is from and old Stampendous set, I believe. The prints were embossed in black and then I added a little bling with the rinestones. Done! 

These pre-colored images are great when you need to pull a quick rabbit out of your hat. It usually takes me upwards of an hour to hand- color and image with Copics, depending on the complexity of the design. These images are ready to size, print and cut.  Very handy in a pinch.

Happy crafting,
Susan

Jan 9, 2023

New Year Squeeze the Day

Happy New Year! 

Sharing a card using KLM Digital Designs Lemon Gnome and sentiment.
The gnome is printed directly to the white card stock layer and colored with Copic Markers.  The gnome was masked to create the background. I drew the lemon for him to sit on, masked off the rest, and brushed on Distress Inks in Squeezed Lemonade, Mustard Seed, and Fossilized Amber. The clouds were created with a stencil from MFT and Speckled Egg Distress Ink.
I used Stampin'UP  Barely Banana paper and PTI lemon stamp from Tea for Two (both retired) to create the yellow background. The red paper is from my Cosmo Cricket stash.
Copics:    Skin - E000, E11
                Beard - YR21, 27, E37
                Basket -E30, 33, 35, 17
                Lemons - Y13, 15, 26
                Glass - T1, gelly roll Clear Star and lemon colors
                Hat - R22, 29, 59
                Pants - YR21, 24, 27
                Shirt - B91, 95, 97, 99
                Boots - T2, 4, 7

Here is a variation using the same image.

For this project, I made recipe box cards, one section marker, and one recipe card.
The Copic colors are similar to the card above with the following exceptions.
Hat- same as lemons, seeds hand drawn with 
    a Multiliner and white gel pen
Pants - B91, 95, 97, 99
Shirt - YG23, 17, G29
Boots - E42, 43, 44, 47
Ground - Distress Inks Twisted Citron Mowed Lawn, Rustic Wilderness

Wishing you a happy, healthy, and crafty New Year.

Oct 21, 2022

Cash Frog Christmas

Hello there. Welcome to my blog.

Today I am sharing what I hope will be a cash holder, for the teens, at Christmas time. Over the years I have found they prefer cash over gift cards so much more. I'm always on the lookout for a fun way to package a few dollars for Christmas. When I saw this cute frog image, I knew I wanted to use him on the small coin envelope from Sizzix.

I used my Epson printer to print the image and sentiment on white card stock and colored the frog with Copic markers. I cut the envelope from Kraft stock with the Sizzix Collector die, then stamped it with a mistletoe die from Stampin'UP (retired). The back closes with a washer/string closure as seen below. The overall size is approximately 3x4 inches.
Add a little glue and it's done. 
 

Materials:
White and kraft card stock, scraps of red, green 
Digital Stamp- Christmas Frog - klmdigitaldesigns.com
Stamp- Peaceful Wishes, Stampin'UP
Sizzix/ Tim Holtz Thinlit - Collector #665926
My Favorite Things Stamps- Stitched Fishtails
Coloring mediums - SU Water-based markers in green and 
        brown
  Copic markers- Y02, G20, YG13, 17, 67, R22, 27, 46, 59, 
C1, C2, Multiliner black, Wink of Stella
Eyelet setter, eyelets or brads, baker's twine

Thanks for stopping by, enjoy your day.

Aug 17, 2022

Gnome Backlog 6 Beach Gnome

Welcome, thanks for visiting.

Yet another gnome in the series of backlogged images. This Seascape Gnome from klmdigitaldesigns is by far a favorite as I love to go to the beach in Maine. 

    Both of the background papers were created using a gel plate and Distress Oxide inks. The Salt Water Taffy base was brayered on the gel press and sprinkled with water using a fan brush. The domed section was gel pressed with Tumbled Glass and stenciled over with Salvaged Patina through MFT's Perfect Pool Water stencil. This piece was cut with the MFT Stitched Dome die. Unfortunately, this die is no longer on the site.
    This sentiment is from the Oceans Sayings set by Stampendous.

The gnome is colored with Copic markers, fussy cut, and glued to the card.

Here is another colored example with a similar Copic color map.

Enjoy what's left of the summer, and go to the beach!