Showing posts with label Background technique. Show all posts

Sep 24, 2022

Gnome Farmer and Fido


Hello there. Thanks for stopping by.


Today's card uses the gnome farmer and fido from klmdigitaldesigns. I detailed his shirt to look checkered, colored the image with Copics, fussy cut, and mounted the image with foam tape. The background is made using the glue resist technique. I added a bit of stenciling with pigment ink to see how it worked. I was pleased with the results. 


There is a little plaid stenciling on the inside as well, where the image finishes.
Dies: Stitched Rectangle Stax, Stitched Sentence strips-  
      MFTstamps
Stencil: THS097  Tim Holtz/Stampers Anonymous
Ink: Versa Claire Shady Lane
Copics:E000, 04, 11
    Y11, 15, 21, 26
    E41, 43, 44
    E97, 99, 47, Y21
    Shirt- T2 shading, G40, 43, 24
Dog- T1, 3, 5, 7 whit gel pen, Black Multiliner


Apr 5, 2021

Old Scraps work!

This card uses a little scrap I just couldn't to throw away. It was made YEARS ago. Probably close to 18 years. That's BAD!

The scrap is on Night of Navy paper from SU and uses a SU stamp set Autumn Floral (long retired). I used some kind of pigment ink to stamp the leaves. Back then I think the only kind I had was the petal shaped inks from Color box.
This little piece resurfaced again last week, so I pulled it out and vowed not to put it away again. It would become a card or trash! 
Then I started playing with the gel press and my Distress Oxides. I peeled this background off the press and tossed it on the table to dry... right next to that little navy strip. It was meant to be. A trip through the cutting machine with a Stitched Rectangle STAX die from MFT , a piece of Night of Navy card stock and the card was nearly done.
The sentiment circle was cut with a Stitched Circle STAX die (MFT) and stamped with a stamp from Mega Mixed Messages- PTI.

Sequins from Studio Katia and a little navy organdy ribbon and it is done. Finally that pretty little piece has a home.


Mar 29, 2021

Tim Holtz Tag inspired

Ah, yes. The Tim Holtz influence is undeniable. I just love his positive attitude and the way he encourages one to create. We need more people in this world with his kind of attitude. Anyway, most everything on this card is directly related to his work.


I used Distress Oxides in Kitsch Flamingo, Worn Lipstick and Spun Sugar on a gel press and Layered a Stampers Anonymous stencil THMM103 here and there.
The tag was cut with MFT Stitched Traditional Tag STAX and the background with Stitched Rectangle STAX.
All the colors on the tag is the pick up from my glass mat when making another project with Distress Oxide Ink.
The Wildflower 2 Sizzix Thinlit was cut from pieces of 
pre-made background papers. That little sentiment is from a sticker tablet, also Tim Holtz.


Mar 26, 2021

SPRING!!!

It's official, Spring has sprung. To celebrate I played with my gel plate again ... and I said I wasn't going to do one more thing that involved a new tool. At least they aren't expensive and I have everything else (surprise 😉).


Paper: Pen and Gear 110lb Card stock; SU Textured cardstock (retired), Basic Black; Recollections 110lb Heavy white card stock (base card)
Coloring medium - Copic markers
Stamps/Images: Simon Says Stamps- Botanical Split  background stamp; Stampendous - Spring Sentiments; MFT- BB Sunflower Sweetheart
Dies: MFT Stitched Rectangle STAX Die-namics, Stitched Scallop Edges 2
Other: Gel Press, Distress Oxide inks, Hero arts Unicorn White pigment ink, double sided foam tape

Mar 17, 2021

Happy Saint Patrick's Day!

Are you wearin' your green?? Havin' corned beef and cabbage for dinner?

I absolutely love the Anita Jeram images at Colorado Craft Company. This little guy is so perfect for St. Patrick's day and incredibly easy to watercolor.


I have also become hooked on gel press backgrounds. (Thanks, Jennifer!) Honestly, I was able to crank out 9 of these little slider cards, from start to finish, including the background paper, in about 6 hours.
I was trying to get them done before the mail person came, but they had a sub on today and she was here WAY earlier than usual.  Oh, well, tomorrow will be okay.


Paper: Pen and Gear 110lb. card stock, Recollections 110lb. white, Gold Foil paper

Stamps/Images: Colorado Craft Company - 4 Leaf Clover; Waltzing Mouse- St.  Patricks stamps; Simon Says Stamps-  Botanical Split background stamp

Color medium: Distress Inks, Distress Oxide Inks
Other: Stencil- A Colorful Life - cloud; Gel Press 5x7
Dies: Honey Bee Stamps fishtail sentiment strips; Sunny Studio- Slider Window 

Mar 16, 2021

I'm a Holtz Junkie


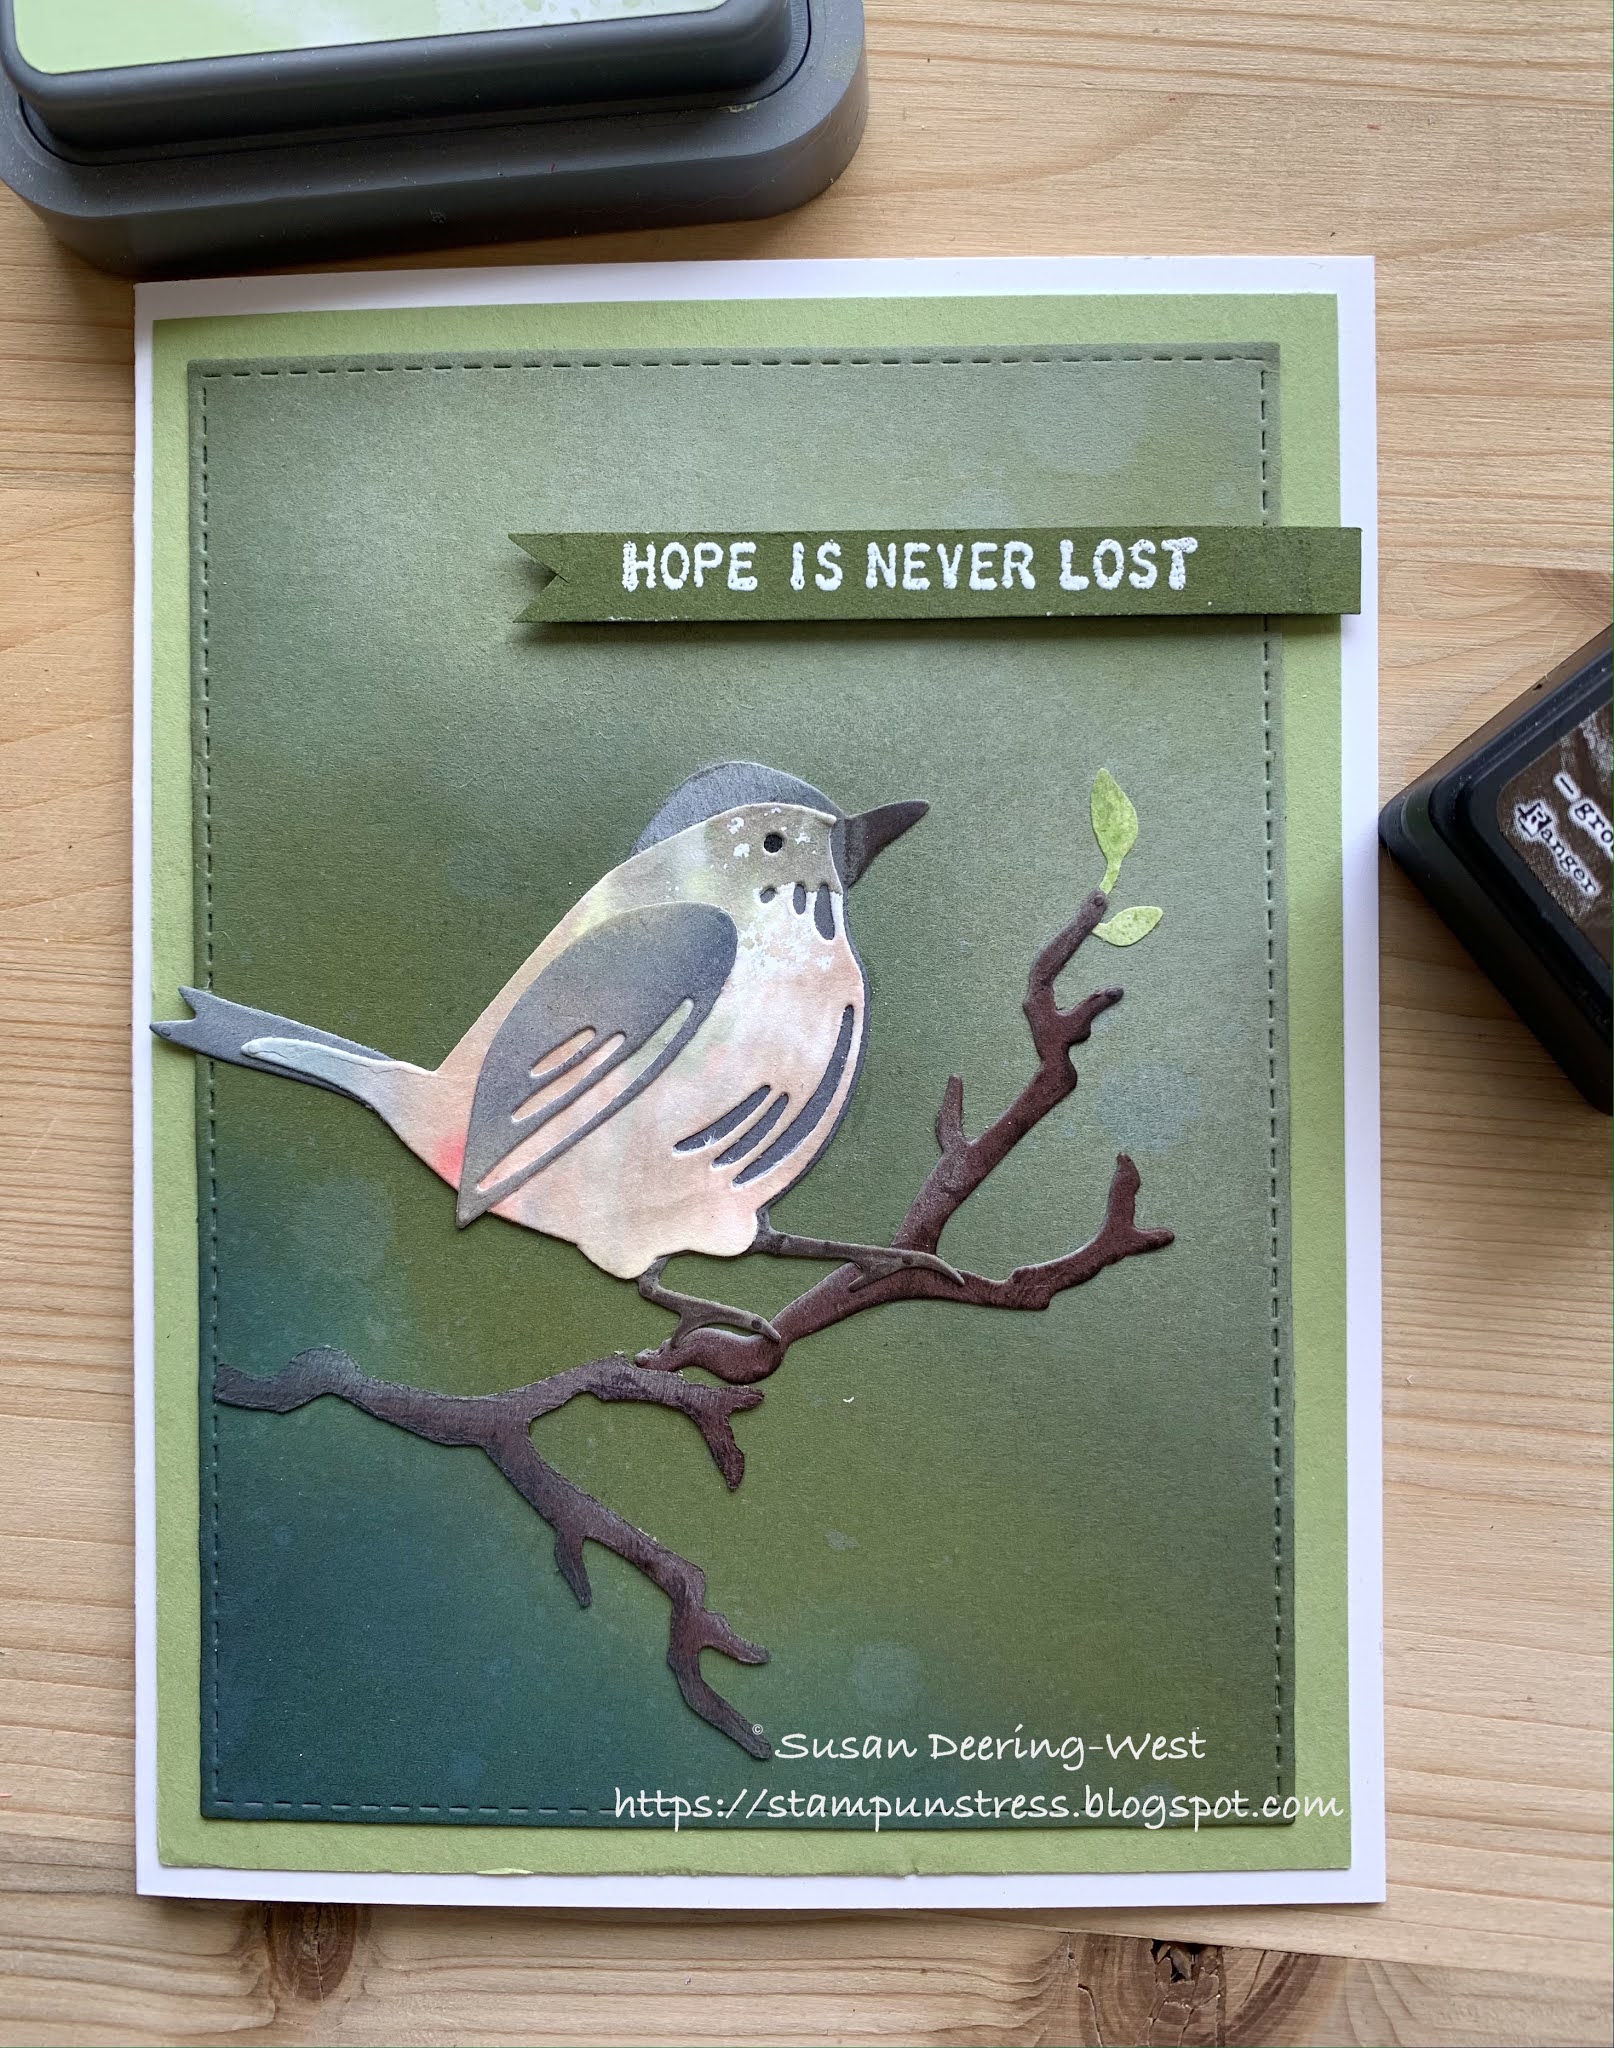
I started to watch Tim's new video on the basics of the Distress Inks this afternoon. I'll most likely watch it again because I barely got into the first 5 minutes of the blending section and a lightbulb went off. I love playing with the inks to make interesting background papers. I have a drawer full, but never enough!😏
 I decided to try this Distress Ink blending on a dark paper. I've used a similar approach on scraps years ago, but not with Distress Oxides. The Oxides make this blending effortless! I loved the results.
I began with a piece of SU Always Artichoke paper. The banner with the sentiment is the original color.
I wanted more depth in the paper so I used Shabby Shutters Oxide in the top right and a combination of Forest Moss, Rustic Wilderness and Black Soot for the bottom left.
I used a touch of Frayed Burlap Oxide on the top of the branches to highlight slightly, then used Ground Espresso Ink on the bottom for shaded texture. 
The bird base was cut from SU Basic Gray card stock. I lightly highlighted the head with Pumice Stone Oxide and the feet with Ground Espresso Ink. The body and wing of the bird are cut from scraps of background papers made last summer. The tiny leaves are from scraps as well.
Dies:
Bird- Sizzix Thinlits Tim Hotz Collection Feathered Friends 664433
Branch- Sizzix Alterations TH collection Fall Foliage 660955
Leaf - Sizzix Thinlits Alteration TH #661206
Sentiment Stamp - Stampers Anonymous Tim Holtz Collection Tiny Text CMS394
Paper- SU Always Artichoke, Early Espresso, Pear Pizzaz, Basic Gray

Jun 29, 2020

Bee Positive

Hello. Welcome to Creative Juice.

Today's card is my attempt at making a Tim Holtz inspired card using ONLY the limited Holtz supplies I own. I can't share cards on the Tim Holtz Addicts FB page if I use other products. Well I guess I won't as I always find something else to use that just "makes" the card. I can't afford all the Tim Holtz stuff I want on a retirement budget. Heaven knows I have plenty of other supplies.

This is a really simple card. The Tiny Text stamp set was the inspiration for this and the bright tag from my background stash just seemed to go with it. The tag is Bristol Smooth paper tapped onto Distress Inks spritzed with water on a glass media mat. The tag was cut with Die-namics Tag Builder Blue Print 7 from MFT Stamps.
Using a Honeycomb stencil from Scrapbook.com, I sponged Mustard Seed and Fossilized Amber Distress Ink on Stampin' UP Barely Banana paper. I added a little depth with Spiced Marmalade.
The flower silhouette is a Sizzix Thinlit. All of the text is from Stampers Anonymous Tiny Text.

I kind of like it. Bee happy,
Susan

Jun 26, 2020

Focus on the good gnome

Hello, thanks for visiting.

Todays card is another mixed style card. Backgrounds and gnomes.The background was my first attempt using distress sprays and oxides. I was really happy with this piece. I sprayed Scattered Straw and Shabby Shutters on the mixed media paper. Then I sprayed a bit of Brushed Corduroy and Frayed Burlap on my glass media mat and spritzed lightly with water. I tapped my paper in the ink and dried it between looks. 
Always a surprise........
I cut the panel with a MFTstamps Stitched Rectangle Die and mounted it onto MFT Kraft card stock.

I used Sizzix Thinlits Tim Holtz Alterations Die to cut hello out of SU Soft Suede card stock 4 times.
I layered the words together to give the word more visual weight. I stamped the focus phrase from Stampers Anonymous Tiny Text then used a micro liner to turn the o into music notes.

The Gnome is from klmdigitaldesign.com and is colored and attached to the card with foam tape.
Don't forget that KLM is now carrying polymer stamps. For those who have been asking for them, a little birdie told me there will be a large release of them SOON.

Have a creative day,
Susan

Jun 22, 2020

Melding of the styles

Good day! I hope it has been a great one so far and this find you well and feeling creative.
It has been so hot here in Vermont the past few days (93-98) the only thing I've been able to do is watch Tim Holtz demos and play with all the backgrounds I've been hoarding. Too hot to work outside!!!

This first card is a combination of two of my favorite things, backgrounds and gnomes. I always have PLENTY of both around so I didn't even have to break a sweat to make this card.

The background was made with Distress Ink that was left on my glass mat. Sometimes I think these give the best results. I just spritzed the ink and dropped a piece of multimedia paper on it, literally! I then used the Sizzix/Tim Holtz Alterations Swiriling Stars die on it. The star piece was mounted on a smooth glitter paper from a Joann's brand pad (hard to see here).

I cut the layer with a Stitched Rectangle Die-namics Die from MFTStamps, and mounted it onto PTI Royal Velvet Paper. It is such a rich purple!

I finally got the Stampers Anonymous Tiny Text set in the mail and had HAD to use it. Love the positive messages in the set. I stamped the sentiment on the scrap left from the panel and layered it on the same purple.

The colored image is the wizard from KLM Digital Designs which is the first of the gnome series they had. It is now in polymer stamps. Great for all of you who have wanted to work with the gnomes but don't do the digital image thing. He is colored with Copic markers.

Have a creative day and, if in Vermont, stay cool!
Susan

Feb 11, 2019

Magical Day

It has been a dog's age since I have been able to get back to creating. Between teaching responsibilities, family illnesses and deaths and home renovations it all got away from me. Now retired, kitchen reno done and, hopefully, everyone fairy healthy, I feel like I can begin again. Hopefully you are all well and still finding the time to create.

This is my latest card. It is for my preteen granddaughter.
The wizard is a digital stamp from KLM Digital Designs
I used Distress Oxide Inks on the background and colored the wizard with Copic Markers. I LOVE coloring with Copics! The stars were cut with the Sizzix stars die and backed with glitter paper that sheds worse than my golden! If you'd like to see some of the things I've created since being away from blogging you can check out my Pinterest page.

I hope to be back soon with more fun. Stay warm, Spring is coming.

Edit: I have had so many ask where the greeting is from.
Actually it is a combination of three sets. Necessity is the mother of invention, right? "Wishing you a" is from an old PTI set called Wishing You; Magical is from MFT's Magical Dragons; Day is from and old red rubber stamp I found at a yard sale! 

Susan

Feb 16, 2011

Bookend Friends

friends support (513x640)

Here is a card that uses one of my favorite techniques. I love to make my own background paper.

I own TONS of patterned paper. I use very little of it. Hummmm . . . .maybe it’s time to thin the stock.

This card uses all Papertrey Ink products unless otherwise stated.

Cardstock: Ocean Tides, Stampers Select White

Stamps: All Booked Up, Turning  a New Leaf

Ink: Tuxedo Black, Versa Mark, Ocean Tides, Brilliance


Dies/ Punches: Mat Stack 3, Limitless Layers, Modern Window and oval punches from SU

Crystals: Michael’s

Coloring medium: Copic markers

Other: Clear Embossing Powder

Technique: masking, sponging

Mask the Mat stack 3 shape. Stamp the leaves in Versa and emboss. Sponge the area around the mat and randomly

on the card front. Die cut the  circle with Limitless Labels. Cut a slightly larger circle, stamp image, color and adhere

to the inside of the card. Stamp and punch sentiment layers; attach to card with dimensionals. Add crystals.

Enjoy!