As promised I will show how to fill the gnome's cart as used in
Wednesday's post.
I have used the same digital image for all four of the cards in the series.
I usually print 4 to a page so I have some on hand all the time to color and use. I either run them through my Scan N Cut machine or fussy cut them. In this case I did the latter.
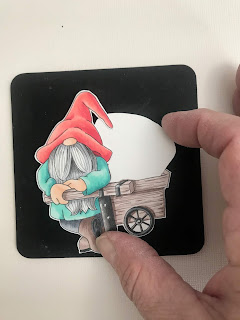
I turned the image here so it would be easier to cut along the top of the carts front frame, stopping at the drawn corner. This leaves a small area uncut.
You can see the cut just above my finger. I'm gently pushing back the inside of the wagon to show the cut areas better. This is the cut that allows you to put items in the cart.
This odd little piece is just a scrap I have cut to build on. The taper on the bottom extends below the edge of the wagon. That notch on the left allows the bottom to slip behind the arm and the top to slip behind the hat. I usually put my image up to a strong light or on a tracing box to lightly sketch a shape and mark the notch. This is not exact as you will most likely trim down the top to the shape you like or increase the depth of the notch as needed.

First I fit the notch in
place behind the hat
and arm, checking the depth of the notch. (left)
Then carefully slide the bottom in place behind the front of the wagon frame. (right)
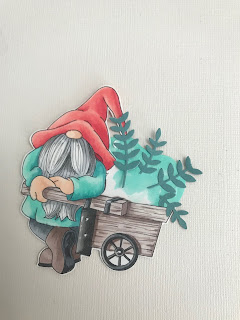
Now is the time to adjust the piece until you are happy with the placement, shape and size.
 As you can see in the
image on the left, I
cut down some of the
building piece. It was
a bit too high for my
liking. I knew that there were likely to be some areas that would not be completely covered so I colored a bit of it so it would blend better with the background. I then started to build from the top as it is the back of the cart contents.
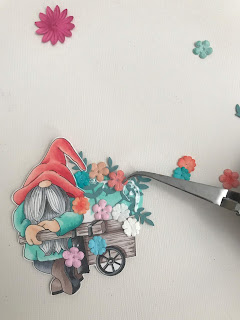
 Continue to build
the contents of the
cart in layers, gluing
layers from back to front. This one is assembled in rows. I laid out the flowers to get the general placement idea, then moved the rows down so I could place them as I got ready for them. Tweezers or hemostat are helpful when placing small pieces.
There are two ways to address the spoke area of the wheel. I have colored it in using a marker matching the background, or cut the white area out with a sharp craft knife to reveal the background.
Here he is, all dapper and ready to be placed on a background with his cart load of flowers!
I hope this helps you in creating with this image.
Visit again to see the other 2 cards. (This is card 4 and can be seen on KLM's shop)!


1 comment:
wow
Post a Comment